Friday, December 9, 2022

Windows 10 เอาใจคนทำงานหลายหน้าจอด้วยระบบ Virtual และ Multiple Desktop


Windows 10 เอาใจคนทำงานหลายหน้าจอด้วยระบบ Virtual และ Multiple Desktop

Virtual Desktop นับว่าเป็นฟีเจอร์ที่อยู่ในความสนใจของหลายๆ คน โดยเฉพาะคนที่ชื่นชอบการทำงานหลายๆ หน้าจอเดสก์ทอปบน Windows สำหรับการใช้งานหลายรูปแบบหลายระบบ ซึ่งบน Windows 10 นี้ก็ได้รับการพัฒนามาให้ใช้งานได้ง่ายสุดๆ ช่วยให้ผู้ใช้สามารถมีมากกว่าหนึ่งหน้าจอ เพื่อเลือกการทำงานได้มากยิ่งขึ้น ผู้ที่ใช้ Linux ก็จะได้รับประโยชน์ในส่วนนี้ด้วยเช่นกัน

Virtual-windows10-1

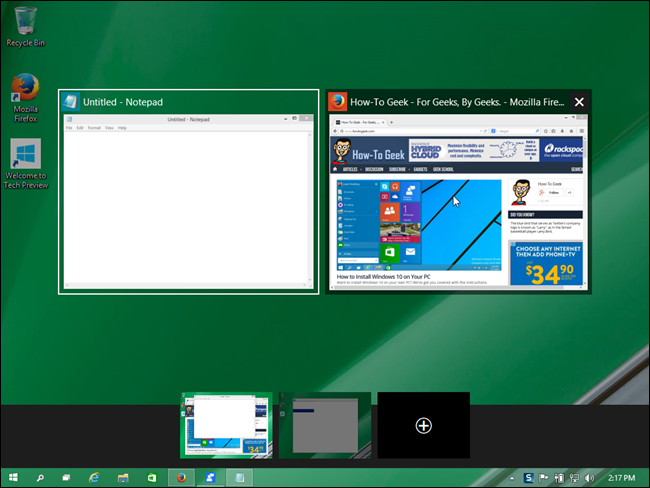
โดยที่ Windows 10 เพิ่มปุ่มใหม่เข้ามา “Task View” ซึ่งปรากฏอยู่บน Taskbar จะช่วยให้ผู้ใช้เพิ่มหน้าจอเดสก์ทอปได้มากขึ้น เมื่อคลิกที่ปุ่ม Task View นี้หรือกดปุ่ม Win + Tab ก็ตาม ก็จะเป็นการเริ่มการทำงาน และระบบจะเปิดการทำงานของหน้าจอเดสก์ทอปใหม่ให้แสดงผลขึ้นมาและยังเพิ่ม Desktop ขึ้นเรื่อยๆ ได้อีกด้วยตามต้องการ

นอกจากนี้กรณีที่ไม่ได้ใช้หน้าเดสก์ทอปใด ก็สามารถยกเลิกหรือปิดการทำงานได้เช่นกัน ด้วยการคลิกที่ปุ่ม Close ที่ปรากฏขึ้นบน Thumbnail นั้นๆ พร้อมทั้งการพรีวิวในแตจ่ละหน้าจอบนเดสก์ทอปได้อีกด้วย จากการลากเมาส์ไปยัง Desktop Thumbnail ในแต่ละหน้าที่แสดงผลอยู่ยนทาส์กบาร์นั่นเอง

Virtual-windows10-2

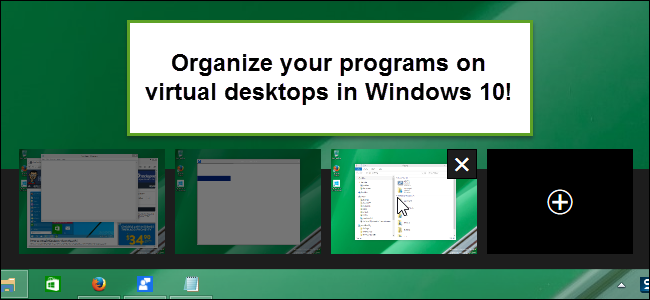
และกรณีที่ต้องการย้ายโปรแกรมจากหน้าเดสก์ทอปหนึ่งไปยังหน้าจออื่นๆ สามารถคลิกขวาที่โปรแกรมที่ต้องการ จากนั้นเลือก Move แล้วเลือก “Desktop x” ระบบก็จะทำการเคลื่อยย้ายโปรแกรมไปยังระบบ Virtual ปลายทางที่ต้องการได้ทันที รวมถึงคุณสามารถใช้การกดคีย์ลัด Win + Ctrl++D สำหรับการสร้าง Virtual Desktop ขึ้นมาใหม่บน Windows 10 และสามารถปิดการทำงานของระบบนี้ด้วยการกด Win + Ctrl + F4 รวมไปถึงการสลับหน้าจอระหว่าง Virtual Desktop เหล่านั้น ด้วยการกด Win + Ctrl + Left หรือ Right ได้ตามต้องการอีกด้วย


CR https://arit.rmutsv.ac.th/th/blogs/497-windows-10-%E0%B9%80%E0%B8%AD%E0%B8%B2%E0%B9%83%E0%B8%88%E0%B8%84%E0%B8%99%E0%B8%97%E0%B8%B3%E0%B8%87%E0%B8%B2%E0%B8%99%E0%B8%AB%E0%B8%A5%E0%B8%B2%E0%B8%A2%E0%B8%AB%E0%B8%99%E0%B9%89%E0%B8%B2%E0%B8%88%E0%B8%AD%E0%B8%94%E0%B9%89%E0%B8%A7%E0%B8%A2%E0%B8%A3%E0%B8%B0%E0%B8%9A%E0%B8%9A-virtual-%E0%B9%81%E0%B8%A5%E0%B8%B0-multiple-desktop-768

Monday, November 28, 2022

SET NETWORK BUT REBOOT LOST!

sudo ip link show


 sudo ip link set dev eth0 down

sudo dhclient eth0

This will bring your eth0 up by using DHCP. Your network is now configured (for the time being).

If you don't have DHCP enabled configure your network by issueing the commands below, the gateway address is the IP address of your router. And your IP should be in the same range as the router is.

sudo ip addr add 192.168.1.14/24 dev eth0
sudo ip link set dev eth0 up
sudo ip route add default via 192.168.1.1

Monday, June 27, 2022

qemu command line

 qemu-system-x86_64.exe -accel hax -cpu core2duo -m 1024 -hda zeroshell.vmdk -net user,hostfwd=tcp::11111-:443 -net nic,model=pcnet -device nec-usb-xhci,id=xhci -netdev user,id=eth01 -device usb-net,netdev=eth01 -device usb-host,bus=xhci.0,vendorid=0x0B95,productid=0x1790


qemu-system-x86_64.exe -accel hax -cpu core2duo -m 1024 -hda zeroshell.vmdk -net user,hostfwd=tcp::11111-:443 -net nic,model=pcnet -device qemu-xhci,id=xhci -netdev user,id=eth01 -device usb-net,netdev=eth01 -device usb-host,bus=xhci.0,vendorid=0x0B95,productid=0x1790


qemu-system-x86_64.exe -accel hax -cpu core2duo -m 1024 -hda zeroshell.vmdk -net user,hostfwd=tcp::11111-:443 -net nic,model=pcnet


device_add nec-usb-xhci

device_add usb-net

Thursday, June 16, 2022

Openwrt on vmware play12 add usb axis 88179 (usblan)

1. Install openwrt ova

 https://openwrt.org/docs/guide-user/virtualization/vmware

2. Install axis usb

opkg update

opkg install kmod-usb-net-axis-ax88179

3. Upgrade vm hardware version

    vmrun.exe" -T player upgradevm test.vmx

4. Batch command for non GUI

"C:\Program Files (x86)\VMware\VMware Player\vmrun.exe" -T player start "c:\VirtualBox VMs\vmware\test\Test.vmx" nogui

5. Add blow in test.vmx for auto attach usb when boot

usb.autoConnect.device0 = "0x0B95:0x1790"

GIMP script-fu multi-crop picture

 Sample 1 this for use in Gimp --> save to test.scm

(define (script-fu-Test_scrip image drawable)
(
(plug-in-autocrop RUN-NONINTERACTIVE image drawable)
(gimp-displays-flush)
(gimp-file-save RUN-NONINTERACTIVE image
drawable filename filename)
)
)
(script-fu-register "script-fu-Test_scrip"
  _"Add Test_scrip"
  _"Add Test_scrip123"
  "Prapop Puapermpoonsiri<prapopp@hotmail.com>"
  "Prapop Puapermpoonsiri
  "2022/06/66"
  "RGB*"
  SF-IMAGE       "Image"           0
  SF-DRAWABLE    "Drawable"        0
)
(script-fu-menu-register "script-fu-Test_scrip" "<Image>/Filters/Decor")

**** need to refresh script-fu in toobar filter

Sample2 for batch command-->

batch-autocrop.scm

  (define (batch-autocrop pattern)
  (let* ((filelist (cadr (file-glob pattern 1))))
    (while (not (null? filelist))
           (let* ((filename (car filelist))
                  (image (car (gimp-file-load RUN-NONINTERACTIVE
                                              filename filename)))
                  (drawable (car (gimp-image-get-active-layer image))))
                  
             (plug-in-autocrop RUN-NONINTERACTIVE
                                   image drawable)
                                   
             (gimp-file-save RUN-NONINTERACTIVE
                             image drawable filename filename)
             (gimp-image-delete image))
           (set! filelist (cdr filelist)))))
  1. Copy the batch-autocrop.scm into the scripts folder

Where do Gimp scripts and plugin live? It’s easy to find out. Open Gimp and within the top menu bar select Edit\Preferences\Folders, expand Folders out and Select “Scripts”. It is recommended to put your personal scripts into your configuration folder as circled in red below.

image of Gimp menu items
  1. Within a terminal change into the directory of images you want to crop and run the script
    gimp -i -b '(batch-autocrop "*.PNG")' -b '(gimp-quit 0)'            <---linux
sample2  Cr. Joe Lotz and Greg Hildström
https://www.joelotz.com/blog/2020/batch-autocrop-png-images-in-gimp.html
I addition :command on windows
C:\Me\12>gimp-2.10 -b "(batch-autocrop \"*.JPG\")" -b "(gimp-quit 0)"
Cr. for fix  Sam Kupera and  saulgoode@flashingtwelve.brickfilms.com
https://www.gimpusers.com/forums/gimp-user/3587-trouble-calling-running-batch-script-in-windows-xp#message14390


Monday, May 9, 2022

Wednesday, February 23, 2022

How To set up OpenVPN Server on Windows

 Installing OpenVPN

Go to OpenVPN official website here to download last installer.

OpenVPN Download Webpage
  • As we want to install OpenVPN as server we will choose Customize :
OpenVPN Windows Installer
  • We enable OpenVPN Service in order to make it work at boot :
OpenVPN Windows Installer
  • And we install EasyRsa in order to be able to create server and clients certificates :
OpenVPN Windows Installer
  • Once done click Close :
OpenVPN Windows Installer

Setting up Certificate Authority (CA) and generating certificates and keys for server and clients

Here we will set up a pki to be able to create our server and clients certificates.

  • Open a Command Prompt as administrator :
Windows command run as administrator
  • And type the following commands to enter inside EasyRSA shell :
C:\Windows\system32>cd C:\Program Files\OpenVPN\easy-rsa
C:\Program Files\OpenVPN\easy-rsa>EasyRSA-Start.bat
  • Remove existing configuration, just for good measure :
# ./easyrsa clean-all
  • Initialize pki, and type yes to confirm :
# ./easyrsa init-pki
OpenVPN on Windows Easy RSA Shell init-pki
  • Build certificate authority :
# ./easyrsa build-ca nopass
[…]
Common Name (eg: your user, host, or server name) [Easy-RSA CA]:ovpn
  • Build server certificate and key :
# ./easyrsa build-server-full server nopass
  • Generate Diffie Hellman parameters :
# ./easyrsa gen-dh
  • Generating client certificates :
# ./easyrsa build-client-full client01 nopass

Certificates

  • Put this files (from C:\Program Files\OpenVPN\easy-rsa\pkiC:\Program Files\OpenVPN\easy-rsa\pki\issued and C:\Program Files\OpenVPN\easy-rsa\pki\private) :
    • ca.crt
    • dh.pem
    • server.crt
    • server.key
  • To C:\Program Files\OpenVPN\config-auto and C:\Program Files\OpenVPN\config folders.
OpenVPN on Windows config-auto folder

Add a Windows Firewall Rule

We need to open 1194 udp port to allow OpenVPN clients connections. Use the Windows Firewall Management Console or this command inside a Administrator command line console to do that.

C:\Windows\system32>netsh advfirewall firewall add rule name="OpenVPN" dir=in localport=1194 remoteport=0-65535 protocol=UDP action=allow remoteip=any localip=any

C:\Program Files\OpenVPN\config-auto\server.ovpn

As administrator, edit C:\Program Files\OpenVPN\config-auto\server.ovpn file :

port 1194
proto udp
dev tun

ca ca.crt
cert server.crt
key server.key
dh dh.pem

server 10.50.8.0 255.255.255.0
ifconfig-pool-persist ipp.txt

keepalive 10 120

comp-lzo

persist-key
persist-tun

status openvpn-status.log

verb 3

Then, restart the OpenVPN service :

  • From, services management console :
Windows Run, services.msc
  • Right click OpenVPNService then Restart :
Windows services management console, restart openvpnservice.
  • Or from an administrator Command Prompt :
C:\Windows\system32>net stop openvpnservice
C:\Windows\system32>net start openvpnservice

Client configuration

Windows Client Logo
  • OpenVPN Client :
    • OS : Windows 10
    • Role : OpenVPN Client

Installing OpenVPN

We will download the same package, and here install with default parameters.

Copy certificates from the Server

  • From the Server get the following files (from C:\Program Files\OpenVPN\easy-rsa\pkiC:\Program Files\OpenVPN\easy-rsa\pki\issued and C:\Program Files\OpenVPN\easy-rsa\pki\private) :
    • ca.crt
    • client01.crt
    • client01.key
  • And paste them to C:\Program Files\OpenVPN\config.
Windows 10, OpenVPN certificates.
  • C:\Program Files\OpenVPN\config\client.ovpn

Edit the client.ovpn file with administrator rights :

client

dev tun

proto udp

remote OPENVPN_IP 1194

resolv-retry infinite
nobind
persist-key
persist-tun

ca ca.crt
cert client01.crt
key client01.key

comp-lzo

verb 3

Establishing the connection

  • Run as administrator
Windows 10, OpenVPN certificates.
  • Start the connection
Windows 10, OpenVPN certificates.
  • A pop up will confim that we are connected
Windows 10, OpenVPN certificates.


creadit : https://shebangthedolphins.net/vpn_openvpn_windows_server.html

Tuesday, February 8, 2022

Sudo with NO password

 cd /etc/sudoer.d

sudo visudo

# add

Username ALL=(ALL) NOPASSWD:ALL

#save

Wednesday, January 5, 2022

Netbean config jdkhome

open file

c:\program files\netbeans-xx.x\netbeans\etc\netbeans.conf


edit line

netbeans_jdkhome="C:\Program Files\Java\jdk-17.0.1"